> ## Documentation Index
> Fetch the complete documentation index at: https://docs.flatkey.ai/llms.txt
> Use this file to discover all available pages before exploring further.
# Quickstart: Make your first Flatkey API call
> Create a Flatkey API key, send an OpenAI-compatible request, and verify it in Usage Logs in about five minutes.
Make your first Flatkey request in about five minutes. You need one API key and the OpenAI-compatible base URL `https://router.flatkey.ai/v1`.
Already using the OpenAI SDK? Keep your request code and change the base URL to `https://router.flatkey.ai/v1`.
## Before you begin
You need:
* A [Flatkey account](https://console.flatkey.ai/sign-up)
* cURL, Python 3.8+, Node.js 16+, or PowerShell
* Prepaid credit for the model request
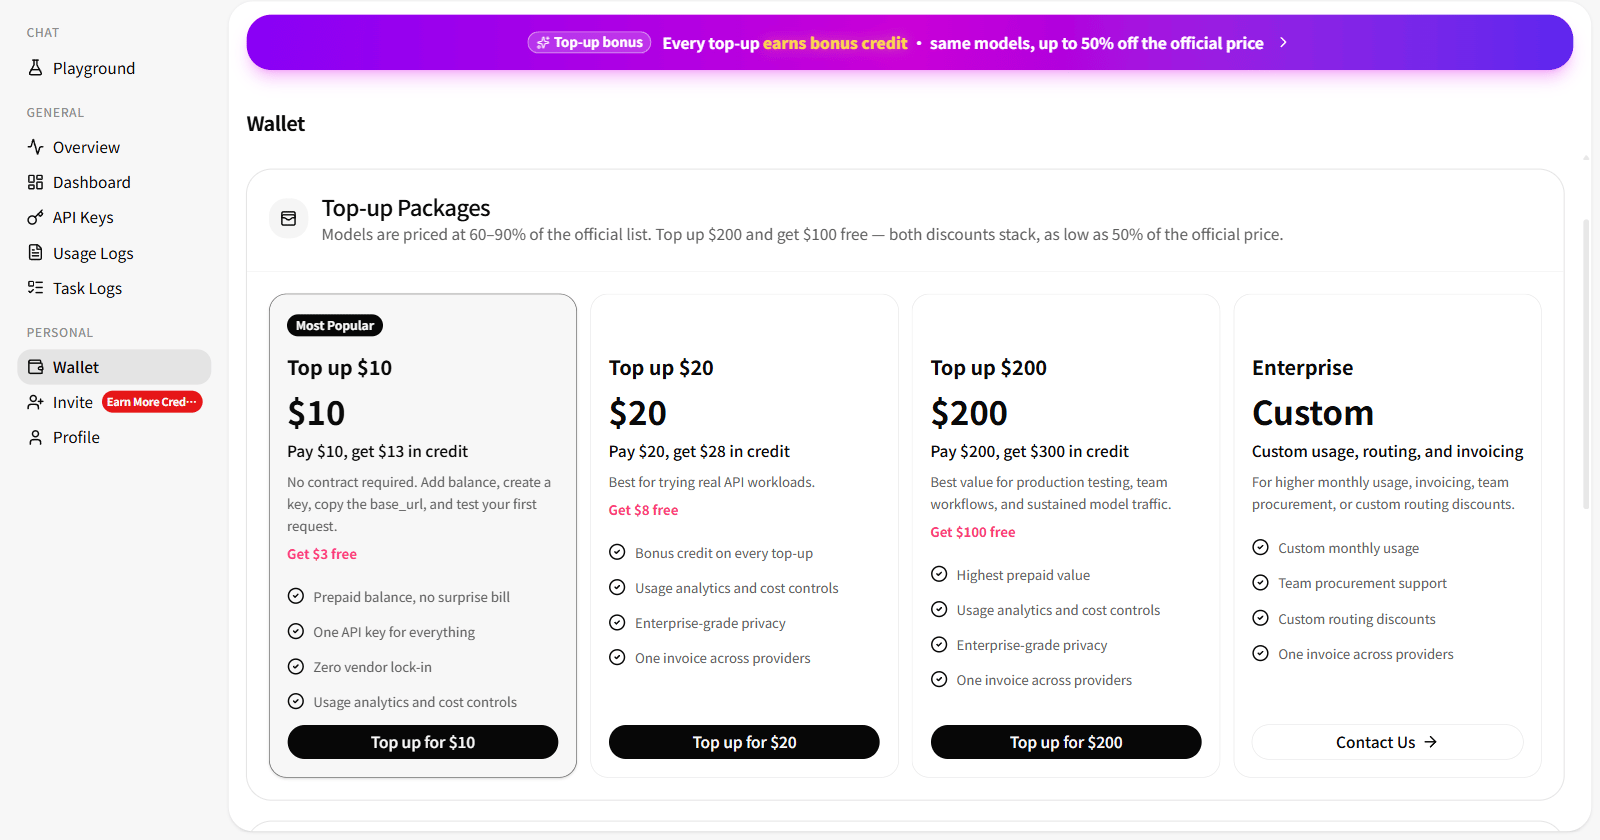
Sign in to the [Flatkey Console](https://console.flatkey.ai). Open **Wallet** and choose a prepaid package that fits your workload.
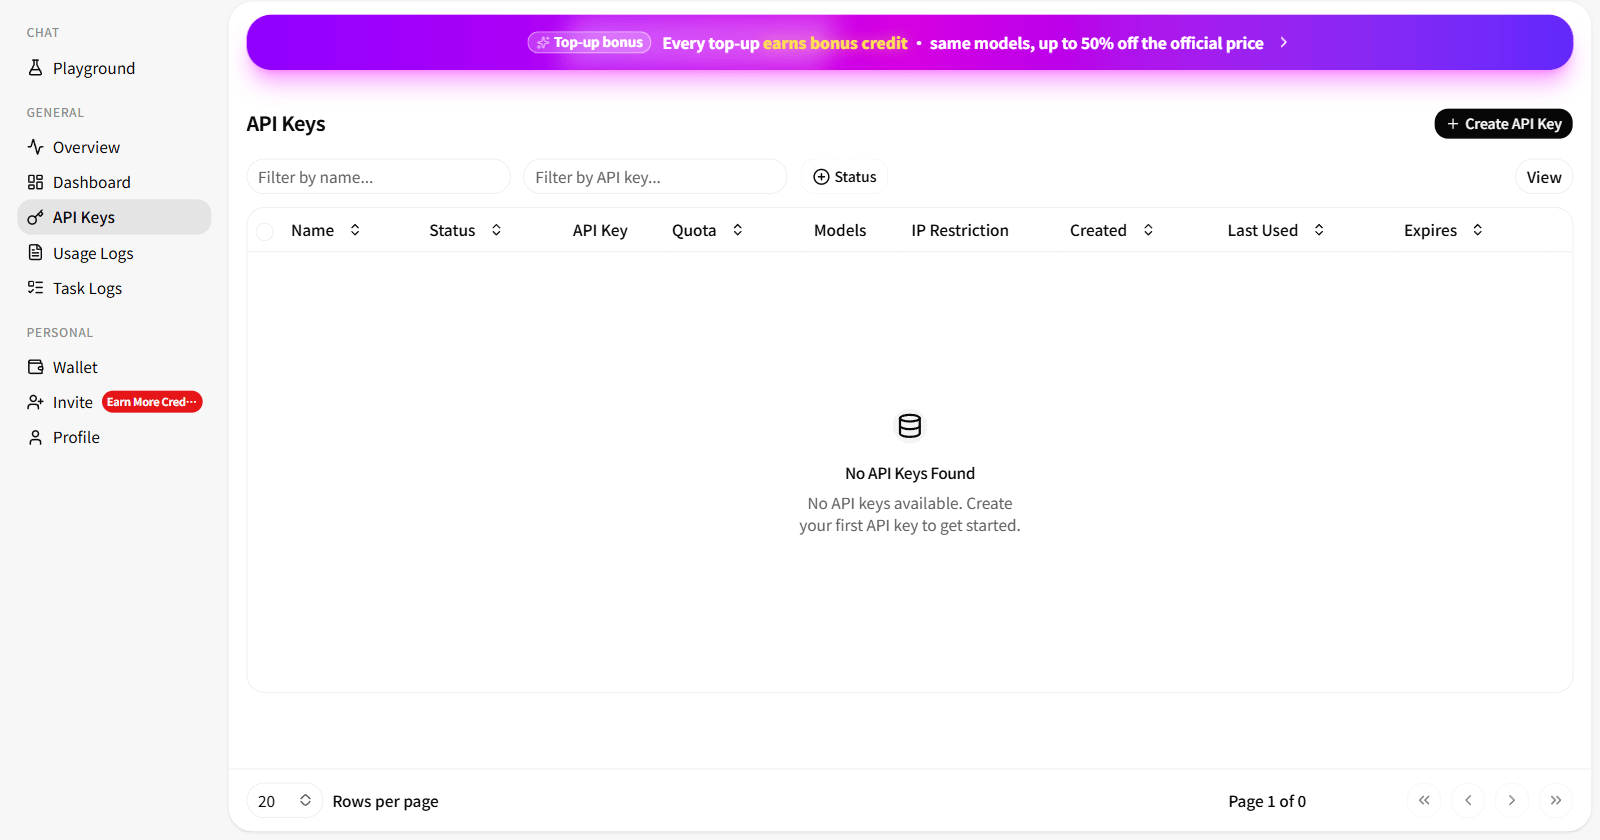
 Next, open **API Keys** and select **Create API Key**.
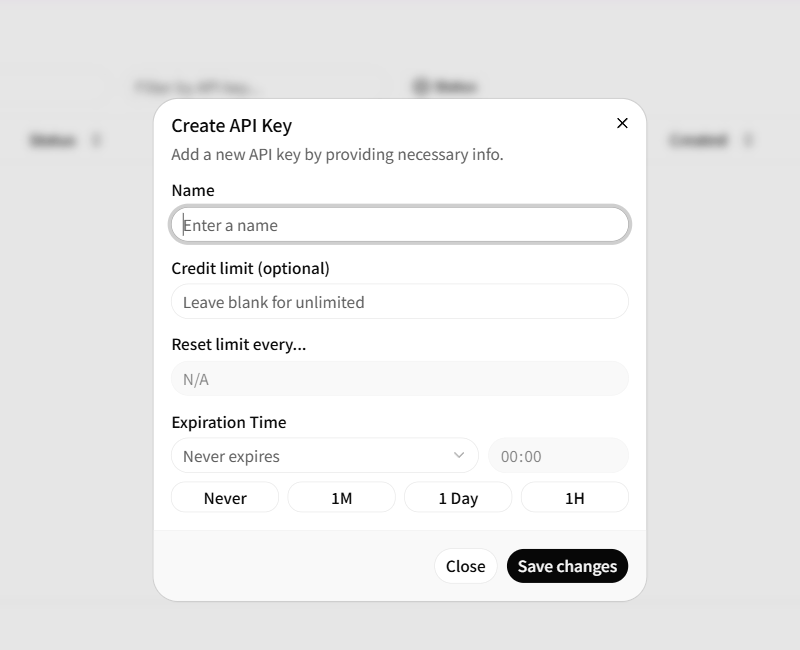
 Give the key a clear name. You can also set a credit limit and expiration time before selecting **Save changes**.
 Copy the generated secret and store it securely. Flatkey API keys start with `sk-fk-`.
Never commit an API key to source control or expose it in browser-side code. Use an environment variable or secrets manager.
Set the API key in your current shell:
```bash macOS and Linux theme={null}
export FLATKEY_API_KEY="sk-fk-..."
```
```powershell Windows PowerShell theme={null}
$env:FLATKEY_API_KEY="sk-fk-..."
```
For Python, install the OpenAI SDK with `pip install openai`. For TypeScript, run `npm install openai`. cURL and PowerShell need no SDK.
The following examples call the same model through the same Flatkey endpoint:
```bash cURL theme={null}
curl https://router.flatkey.ai/v1/chat/completions \
-H "Authorization: Bearer $FLATKEY_API_KEY" \
-H "Content-Type: application/json" \
-d '{
"model": "gpt-4o-mini",
"messages": [
{"role": "user", "content": "Hello! What can you do?"}
]
}'
```
```python Python theme={null}
import os
from openai import OpenAI
client = OpenAI(
api_key=os.environ["FLATKEY_API_KEY"],
base_url="https://router.flatkey.ai/v1",
)
response = client.chat.completions.create(
model="gpt-4o-mini",
messages=[
{"role": "user", "content": "Hello! What can you do?"}
],
)
print(response.choices[0].message.content)
```
```typescript TypeScript theme={null}
import OpenAI from "openai";
const client = new OpenAI({
apiKey: process.env.FLATKEY_API_KEY,
baseURL: "https://router.flatkey.ai/v1",
});
const response = await client.chat.completions.create({
model: "gpt-4o-mini",
messages: [
{ role: "user", content: "Hello! What can you do?" },
],
});
console.log(response.choices[0].message.content);
```
```powershell PowerShell theme={null}
$headers = @{
Authorization = "Bearer $env:FLATKEY_API_KEY"
"Content-Type" = "application/json"
}
$body = @{
model = "gpt-4o-mini"
messages = @(
@{ role = "user"; content = "Hello! What can you do?" }
)
} | ConvertTo-Json -Depth 4
$response = Invoke-RestMethod `
-Uri "https://router.flatkey.ai/v1/chat/completions" `
-Method Post `
-Headers $headers `
-Body $body
$response.choices[0].message.content
```
After the request completes, open **Usage Logs** in the Flatkey Console. Enter `gpt-4o-mini` in **Model Name** and select **Search**. The screenshot shows where to apply the filter; your completed request should appear in the table with token counts, latency, and cost.
Copy the generated secret and store it securely. Flatkey API keys start with `sk-fk-`.
Never commit an API key to source control or expose it in browser-side code. Use an environment variable or secrets manager.
Set the API key in your current shell:
```bash macOS and Linux theme={null}
export FLATKEY_API_KEY="sk-fk-..."
```
```powershell Windows PowerShell theme={null}
$env:FLATKEY_API_KEY="sk-fk-..."
```
For Python, install the OpenAI SDK with `pip install openai`. For TypeScript, run `npm install openai`. cURL and PowerShell need no SDK.
The following examples call the same model through the same Flatkey endpoint:
```bash cURL theme={null}
curl https://router.flatkey.ai/v1/chat/completions \
-H "Authorization: Bearer $FLATKEY_API_KEY" \
-H "Content-Type: application/json" \
-d '{
"model": "gpt-4o-mini",
"messages": [
{"role": "user", "content": "Hello! What can you do?"}
]
}'
```
```python Python theme={null}
import os
from openai import OpenAI
client = OpenAI(
api_key=os.environ["FLATKEY_API_KEY"],
base_url="https://router.flatkey.ai/v1",
)
response = client.chat.completions.create(
model="gpt-4o-mini",
messages=[
{"role": "user", "content": "Hello! What can you do?"}
],
)
print(response.choices[0].message.content)
```
```typescript TypeScript theme={null}
import OpenAI from "openai";
const client = new OpenAI({
apiKey: process.env.FLATKEY_API_KEY,
baseURL: "https://router.flatkey.ai/v1",
});
const response = await client.chat.completions.create({
model: "gpt-4o-mini",
messages: [
{ role: "user", content: "Hello! What can you do?" },
],
});
console.log(response.choices[0].message.content);
```
```powershell PowerShell theme={null}
$headers = @{
Authorization = "Bearer $env:FLATKEY_API_KEY"
"Content-Type" = "application/json"
}
$body = @{
model = "gpt-4o-mini"
messages = @(
@{ role = "user"; content = "Hello! What can you do?" }
)
} | ConvertTo-Json -Depth 4
$response = Invoke-RestMethod `
-Uri "https://router.flatkey.ai/v1/chat/completions" `
-Method Post `
-Headers $headers `
-Body $body
$response.choices[0].message.content
```
After the request completes, open **Usage Logs** in the Flatkey Console. Enter `gpt-4o-mini` in **Model Name** and select **Search**. The screenshot shows where to apply the filter; your completed request should appear in the table with token counts, latency, and cost.
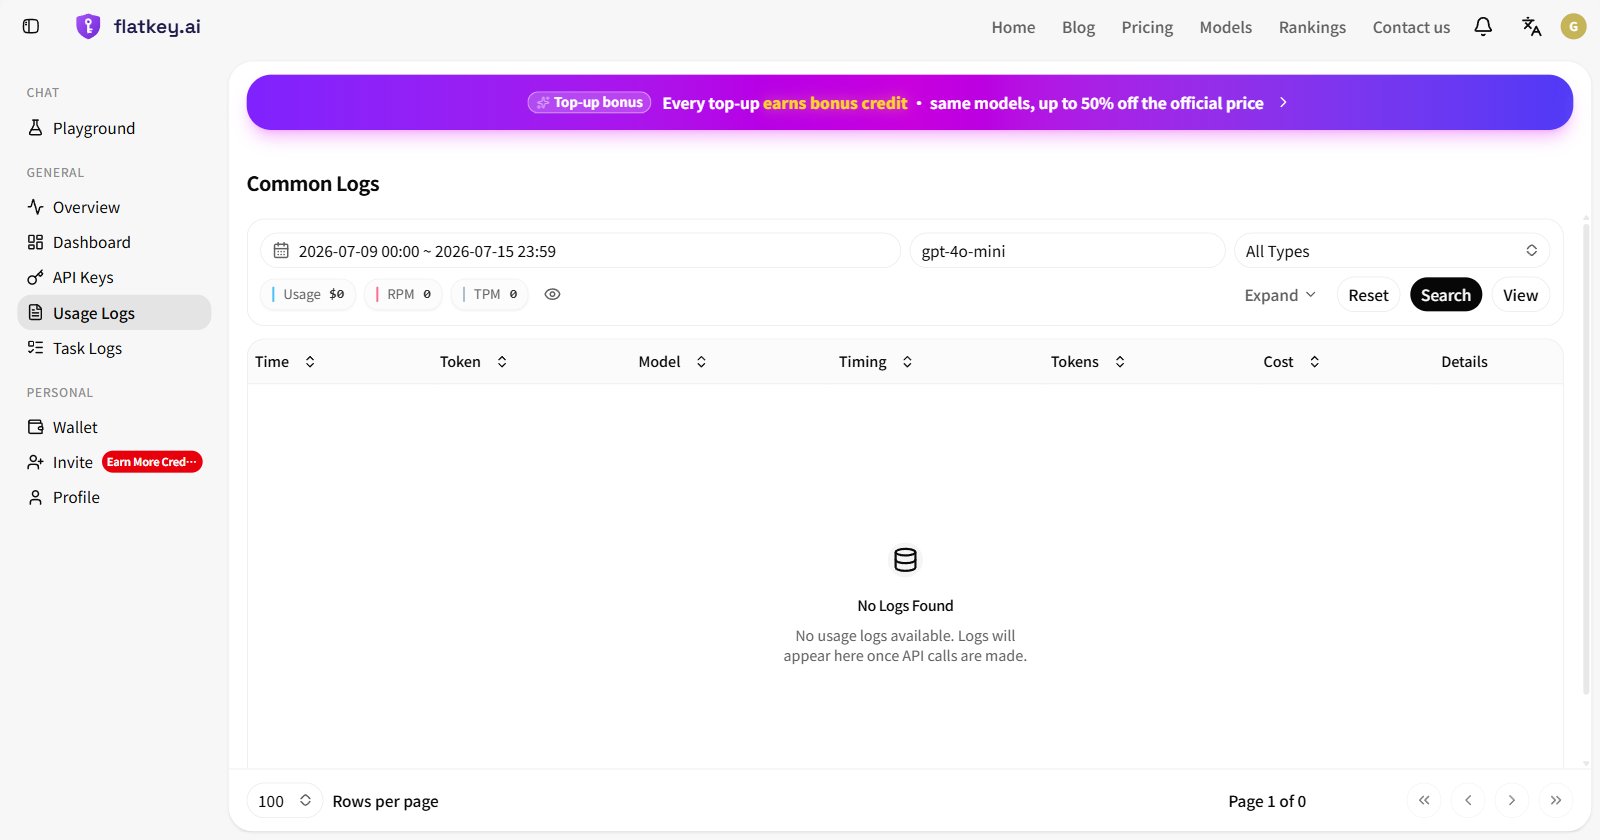 If the table still shows **No Logs Found**, wait a few seconds and search again. If it remains empty, confirm the API key and Base URL used by the request.
Connect Flatkey to the coding tool you use:
Configure Claude Code manually or with CC Switch.
Route Codex CLI requests through Flatkey.
Configure the Codex desktop app manually or with CC Switch.
## Read the response
For Chat Completions responses, the fields you will use most often are:
* `choices[0].message.content` — generated text
* `model` — the model that handled the request
* `usage` — prompt, completion, and total token counts
See the [Chat Completions reference](/api-reference/chat-completions) for the complete schema.
## Stream the response
Set `stream` to `true` when you want tokens as they are generated.
```bash cURL theme={null}
curl --no-buffer https://router.flatkey.ai/v1/chat/completions \
-H "Authorization: Bearer $FLATKEY_API_KEY" \
-H "Content-Type: application/json" \
-d '{
"model": "gpt-4o-mini",
"messages": [
{"role": "user", "content": "Write a two-line welcome message."}
],
"stream": true
}'
```
```python Python theme={null}
stream = client.chat.completions.create(
model="gpt-4o-mini",
messages=[
{"role": "user", "content": "Write a two-line welcome message."}
],
stream=True,
)
for chunk in stream:
content = chunk.choices[0].delta.content
if content:
print(content, end="", flush=True)
```
```typescript TypeScript theme={null}
const stream = await client.chat.completions.create({
model: "gpt-4o-mini",
messages: [
{ role: "user", content: "Write a two-line welcome message." },
],
stream: true,
});
for await (const chunk of stream) {
process.stdout.write(chunk.choices[0]?.delta?.content ?? "");
}
```
## Handle common errors
| HTTP status | What it usually means | What to do |
| -------------------------- | ------------------------------------------------ | ----------------------------------------------------------------------- |
| `401` | The API key is missing, invalid, or revoked | Check the `Authorization: Bearer` header and create a new key if needed |
| `401 insufficient_balance` | The prepaid balance is empty | Add credit from **Wallet** |
| `404 model_not_found` | The model ID is misspelled or unavailable | Check the [Model Directory](/reference/model-list) for the exact ID |
| `429` | The request exceeded a rate limit | Retry with exponential backoff and jitter |
| `500` or `503` | The provider or route is temporarily unavailable | Retry with backoff and check [Model Health](/reference/model-health) |
See [API errors](/api-reference/errors) for response formats and troubleshooting details.
## Next steps
Learn how Flatkey API keys and authorization headers work.
Find supported model IDs and current pricing.
Use Flatkey with the OpenAI Python and TypeScript SDKs.
Monitor requests, token usage, latency, and cost.
Understand prepaid credit and usage charges.
If the table still shows **No Logs Found**, wait a few seconds and search again. If it remains empty, confirm the API key and Base URL used by the request.
Connect Flatkey to the coding tool you use:
Configure Claude Code manually or with CC Switch.
Route Codex CLI requests through Flatkey.
Configure the Codex desktop app manually or with CC Switch.
## Read the response
For Chat Completions responses, the fields you will use most often are:
* `choices[0].message.content` — generated text
* `model` — the model that handled the request
* `usage` — prompt, completion, and total token counts
See the [Chat Completions reference](/api-reference/chat-completions) for the complete schema.
## Stream the response
Set `stream` to `true` when you want tokens as they are generated.
```bash cURL theme={null}
curl --no-buffer https://router.flatkey.ai/v1/chat/completions \
-H "Authorization: Bearer $FLATKEY_API_KEY" \
-H "Content-Type: application/json" \
-d '{
"model": "gpt-4o-mini",
"messages": [
{"role": "user", "content": "Write a two-line welcome message."}
],
"stream": true
}'
```
```python Python theme={null}
stream = client.chat.completions.create(
model="gpt-4o-mini",
messages=[
{"role": "user", "content": "Write a two-line welcome message."}
],
stream=True,
)
for chunk in stream:
content = chunk.choices[0].delta.content
if content:
print(content, end="", flush=True)
```
```typescript TypeScript theme={null}
const stream = await client.chat.completions.create({
model: "gpt-4o-mini",
messages: [
{ role: "user", content: "Write a two-line welcome message." },
],
stream: true,
});
for await (const chunk of stream) {
process.stdout.write(chunk.choices[0]?.delta?.content ?? "");
}
```
## Handle common errors
| HTTP status | What it usually means | What to do |
| -------------------------- | ------------------------------------------------ | ----------------------------------------------------------------------- |
| `401` | The API key is missing, invalid, or revoked | Check the `Authorization: Bearer` header and create a new key if needed |
| `401 insufficient_balance` | The prepaid balance is empty | Add credit from **Wallet** |
| `404 model_not_found` | The model ID is misspelled or unavailable | Check the [Model Directory](/reference/model-list) for the exact ID |
| `429` | The request exceeded a rate limit | Retry with exponential backoff and jitter |
| `500` or `503` | The provider or route is temporarily unavailable | Retry with backoff and check [Model Health](/reference/model-health) |
See [API errors](/api-reference/errors) for response formats and troubleshooting details.
## Next steps
Learn how Flatkey API keys and authorization headers work.
Find supported model IDs and current pricing.
Use Flatkey with the OpenAI Python and TypeScript SDKs.
Monitor requests, token usage, latency, and cost.
Understand prepaid credit and usage charges.